Showing posts with label repairs upgrades. Show all posts

Thursday, February 14, 2019

2017 & 2018: Reviewing Safety & Security

Ongoing Saga: #8

Main Hatch Storm Lock.  I decided that our main hatch should have some better means of securing the hatch in the closed position and also for the storm boards to be securely held in place.  On the top storm board (there are 3, one on top of another) I mounted simple ss slides so that, when the bolts are slid into their respective holes drilled into the side of the hatchway, they locked the top storm board in place.

For the sliding hatch, which is just a flat piece of acrylic, I drilled two holes, one on either side of the hatch, so that I could slide a pin down into a length of plastic beading that I had screwed to the sides of the hatchway.  I can lock the hatch closed in this position by sliding the pin in place from either top or bottom, and if necessary, the person inside the boat can also slide the pin out without anyone’s assistance from the cockpit.  I can also lock the pin from below to provide security and prevent anyone entering the inside of the boat eg when on a town dock in a place with doubtful security.

Flares.  I needed to add to my considerable stock of rescue flares as they were all out of date.  You cannot purchase flares in Portugal without going through a very convoluted and involved bureaucratic process as the authorities have designated flares as explosives.  So, I guess if people there are interested they travel to another EU country, purchase flares there then bring them back to Portugal without declaring them.  A very stupid policy.  I might add you cannot purchase them via the web as it is illegal to mail them around the EU.

So, on our arrival in the Canaries (Spain), we were able to purchase a new set over the counter at the local chandlery.  Apart from the obvious of having up-to-date flares on board, yesterday as I write this (15Apr18 at Brunswick Landing, Georgia, USA), we were boarded and inspected by the US Coast Guard as we approached our marina.  They were happy that I had current flares and, interestingly, didn’t care about all the other out of date ones that were stored with them in our getaway bag.

Jordan Series Drogue.  Years ago I had purchased a kit from Sailrite and laboriously attached 138 cones to the line they supplied.  With the Atlantic crossing looming I decided to finish it off properly and have it instantly available in the cockpit to deploy whenever I needed to.  There’s more to having a series drogue than just a line with the recommended number of drogues.  A lot has been written about them since I purchased mine 10 years ago and some pretty good lessons have come out as a result of sailors using them under extreme conditions.  Interestingly, many sailors did not agree on all aspects so I had to make some decisions myself. I also consulted my son, who is a rope access technician, and spend his work days with his life dependant on the lines he sets for himself.  He had some good advice about rope stress points and where best to secure the drogue on the boat.

The attachment point for the bridle at the stern is very important ie it’s recommended that it needs to be something a bit better than the stern cleats or cockpit winches, although some boats have utilized these in extremes when they had to deploy their series drogue.  I decided that the base of the legs of my standard stainless steel arch would be adequate.  There are two base plates each side bolted (4/plate) to the deck with metal backing plates. 

There is also much discussion whether one should rely on knots or utilize splices.  Splices won hands down when it came to tests.  I did need to rely on a knot where the bridal lines were attached to the arch and I chose to use a knot called the double fisherman's loop, which held up about the best in one particular testing by Yachting Monthly (YouTube video) that I reviewed ie it’s about as strong as an eye splice.  


So I purchased new 18mm braided nylon line, spliced it then attached the bridle to the eye that I also spliced into the leader.  The ends of the bridle I attached to the base of the arch.  At the far end I linked a bunch of chain of various lengths that I had on board and moussed the  shackles used to join them all.  Finally I put it all into a bag (old sail bag) and secured it with line to various points on the pushpit and arch nearby. 

In the event I had to use it I planned to flake the drogue on the cockpit floor before launching it or, if in a hurry, I could just deploy it straight from the bag but you can never be sure that it won’t become tangled and it’s too late if it’s on its way out being pulled by all the drogues filling.  Anyway, I have never had to use it thank goodness but it certainly provides peace of mind knowing that it is all done and ready to go at very short notice.

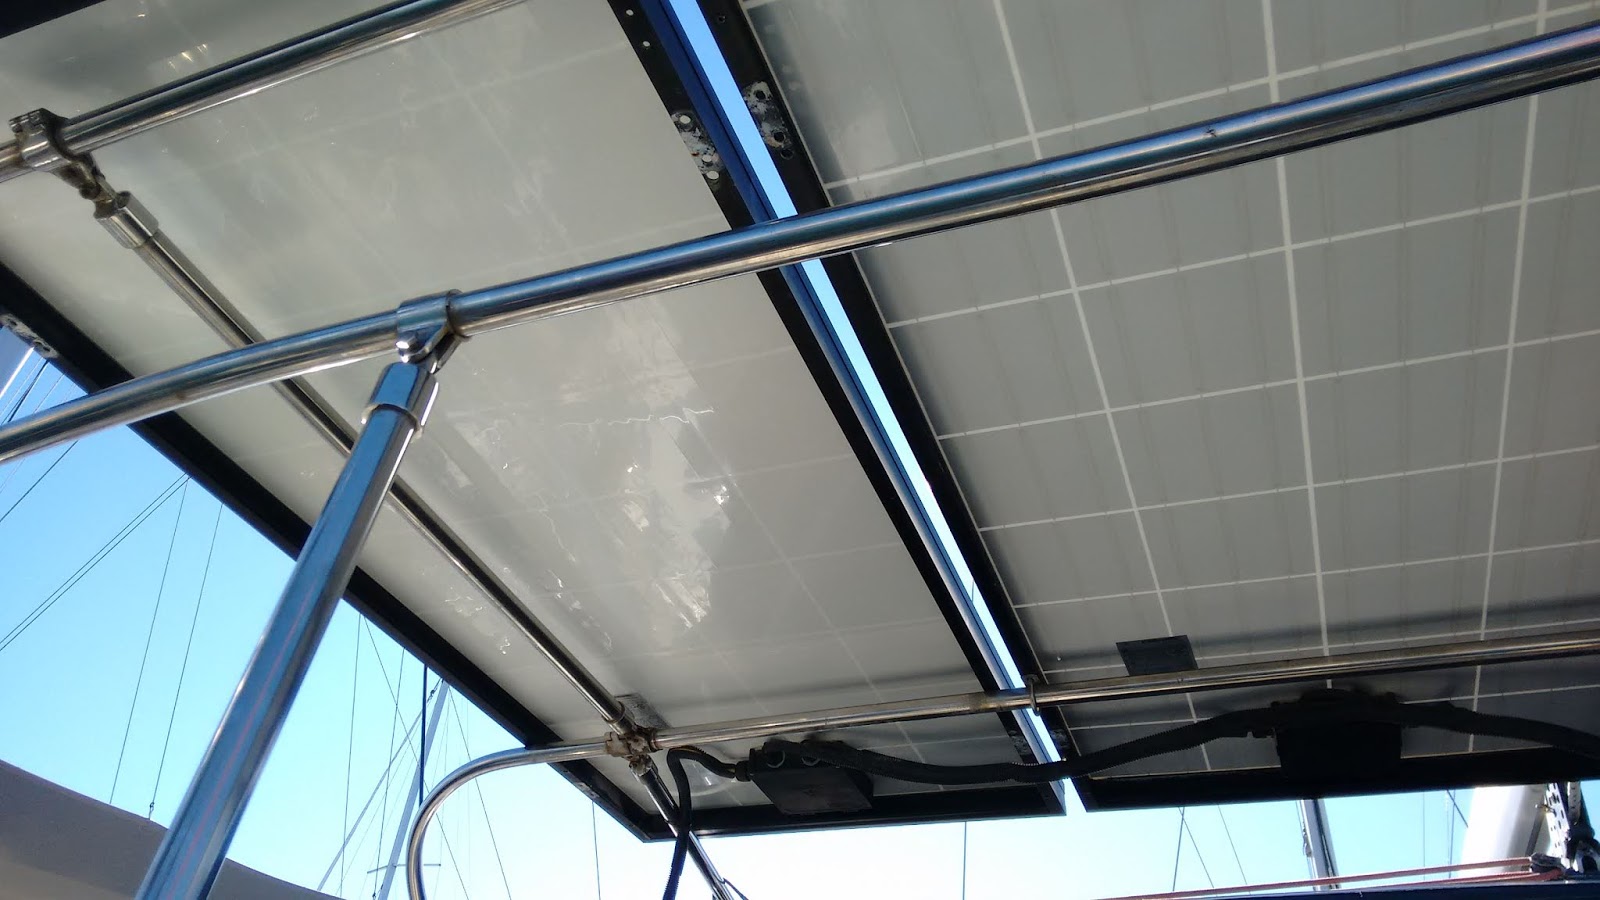
Hydrovane.  Yes, it was time to put the Hydrovane back in business ready for our Atlantic Crossing.  I find it adds an extra rudder giving me some backup if ever we need it too.  It all fitted on well, except I noticed that the vane was connecting with our solar panel framing.  Not good for the vane fabric.  So whilst waiting for the mast repair to be undertaken, I used the time in Portimao Marina to move the solar panels forward a bit.  Easier said than done.  Time well spent.

The Hydrovane (red vane) rubbing on the solar panels.  Lots of kissing in the night!


Moved further apart - all good now

Tuesday, February 5, 2019

2017 & 2018: Refrigeration in a Kit

Ongoing Saga: # 5

New Fridge and Freezer.


We still had the original Grunert freezer and fridge which were operated by a single 110 volt compressor.  This necessitated running the generator while at sea, twice a day for around half to one hour (depending on air  temperature), or using shore power, to bring down the temperature in the cold storage plates.  The boat also had to be in the water as it used sea water for cooling the compressor.  Eventually, it also leaked gas - oh so slowly so that it couldn’t be detected by my elec detector – an unusual expensive type of gas not readily available, especially in Europe, of course.

As the Grunert fridge/freezer couldn’t be used at all on the hard, shortly after we purchased the boat (now some 12 years ago) we purchased and connected an air-cooled Waeco car fridge/freezer in the store room.  It uses 12/24/110/240 volt (you choose) and you can use it as a fridge, freezer, or whatever you like as you set the temperature digitally.  Uses about 3 amps once at set temperature and makes no noise.  We love it and wanted the same for the fridge and freezer, except just 12 volts would do. So, I searched the internet and Penguin Marine in the UK had a very user friendly planner that you follow yourself before contacting them for a quote.  As it turned out they were also very professionally friendly as I did need to call and clarify a number of matters that needed to be sorted.  See below.  Remember the boat was in Portugal so UK is convenient for me in many respects: they speak English (and understand my aussie accent) so it's easy to speak in technical specifics and no customs duty involved.

Firstly, I removed the old compressor – it weighed a ton and just dropped it over the side of  the boat, then wangled it into a dumpster in the yard.  Same with the cold plates – one had to be cut into two to get it out of the fridge (it also served as a shelf) which I did using my high speed grinder.  They also weighed a lot.

The most important aspect was to measure the size of the compartments, in my case the fridge is …. litres and the freezer … litres.  The fridge and freezer run fore and aft along the side of the hull, their tops forming part of the main counter top in the galley.  The company site has the formulas to work out volumes for odd shapes which are fairly easy to follow but I also left it up to them to do the maths and, therefore, recommend the appropriate respective sizes for compressors and evap plates.  This involved a number of emails and finally a phone conversation or two to sort it all.  We ended up with a bigger evaporator than originally identified for the freezer so it’s worth the effort to get it right.  Very important obviously but in the end it worked out quite well.

The kit that was recommended by the company was two Frigoboat compressors (one for fridge, one for freezer), an evaporator plate in each of the fridge and freezer compartments, water cooling for both while in the water (quieter, better for hot climates, less power required) and a separate air cooler for the freezer (my choice) which allows it to be run on the hard (with the Waeco in support as the fridge).  There are also two thermostats – one for each box.  There’s also a ‘control box’ that controls the compressors, and the water pump turning them off and on after feedback from the thermostats which are attached to the evap plates. 

Access into the fridge and freezer for fitting evaporator plates was a challenge.  The fridge has top and side access which is necessary as the GS used to almost fall in when accessing from the top to get at things on the bottom.  The fridge is actually quite large.  The freezer only has a top access hatch and we found it was just too small to fit the evaporator through.  So, I had to remove the petition separating fridge and freezer compartments and glassed over both sides of the foam as the original veneer had largely separated from the foam and rotted.  It made for a much better petition and I put it back after I had put the freezer evaporator plate into the compartment via the fridge.  I then sealed/fixed it in place using silicone sealant, but you could use some other adhesive sealant, as the silicone is a bit smelly for quite some time before the odours eventually go away.

Only after the petition was in place could I then fix the freezer evaporator plate (a U shape)  in place as one side had to be attached to the petition as well as two other sides (front and forward bulkhead).  The outside wall of the freezer (which slopes downward as per the side of the boat) could not be utilized due to the large size of evaporator plate we needed.  The evaporator plate for the freezer came bent to shape with all the other bits and pieces and fitted just right.  This is where the measurements of the compartments (by me) are so important.

The fridge evaporator plate arrived unbent to shape (it should have been L shaped ie to attach on two sides of the fridge compartment) and I had to do it myself, which shouldn’t have happened.  The staff at Penguin were apologetic, however, yet very helpful and explained what to do and how to measure correctly, etc.   Briefly, I heated the plate with my heat gun where I had to bend it until it was too hot to touch then bent it (using gloves) over a piece of pvc pipe I scrounged from around the boatyard.  This particular job, dare I say, turned out to be the easiest and simplest of all the jobs surrounding the whole project, although I was somewhat nervous beforehand I admit.

Now the real fun began. The plates have (pre-gassed) gas copper lines fixed to the plates (soldered?) in a coil, which have to be unwound and then fed through their respective openings eventually leading to the compartment identified for the compressors, while using minimum bending and unbending.  This was a challenge but what I did was unroll them first making them more or less straight before inserting them through the various openings as I fed the evap plates into their respective boxes.    The freezer pipe and plate fed via the fridge with the pipe being fed through a whole in a bulkhead separating the freezer compartment and the saloon, into the compressor area which is under the saloon fore and aft seat.  Once freezer evap plate was inside its compartment (just loosely) I fixed the freezer/fridge petition into place.  

Once the petition was fixed in place I then fixed the freezer evap plate to the petition and two other walls.   This is a bit fiddly as there are a number of spacers which have to be fixed behind the plates to keep them just off the walls.  Another reason that the measuring process must be quite right for the U shaped plate, much less so for a L shaped plate.  In the case of the fridge its piping went through a hole in the outside edge of the petition, then through the freezer compartment, through the bulkhead hole into the compressor compartment.  I was alone to do all the above and it would have been much easier if I had an assistant to help manhandle the copper pipe while also manoeuvring the evap plates.   Much cursing.

I bent the copper pipes out of the way while I mounted the compressors, air cooler, and the control box.  Beforehand I had mounted the water pump after taking out the old 110 volt pump.  I utilized the old mounting for the 12 volt water pump.  The air cooler had to be mounted next to the freezer compressor as you need to change the couplings between compressor (when it’s in the water) and the air cooler copper pipe when it’s out of the water.  You need to minimize any bending or unbending of copper tubes.  The couplings are easy to connect and disconnect – no real tightening to be done other than the minimum as per the instructions.  You also don’t lose refrigerant as you change connections.

Next to last step was plumbing.  I used the same thru-hull sea cock as for the old 110 volt system, then ran intake hoses to each of the compressors, then outlet hoses from compressors to the same old hose for the water to pump out overboard via the sea cock on the side of the hull.

The final step was the wiring and, as I had run out of switches on the switchboard, I fitted a small switchboard with separate switches/circuit breakers, connecting them to the power and then to the control box.  A bunch of other wires from compressors, thermostats, water pump all connected to the control box.


And it ALL WORKED, thank goodness, and very pleased with the result.  The freezer really is a deep freeze and the fridge works a treat.  I put shelving in the fridge too and also floors in both fridge and freezer.  I attached plastic netting with plastic cable ties to the faces of the evap plates to help protect them from bumps etc.

Also, at the very start I serviced the seal for the top loading fridge hatch.  Ever since we purchased the boat, part of the seal had become a bit twisted and so the seal was never perfect.  I found that by using the heat gun I could twist it back to its original shape and it has seated perfectly ever since.  If only I’d known this 12 years ago.  In preparation I had also read up and looked at YouTube videos, which were all very helpful.  Although it was some effort to put together, we're wondering why we persevered with expensive re-gassing and inefficient cooling over the years.  Now, it's all working a treat.

Thursday, January 31, 2019

2017 & 2108: Anchoring Modifications

Ongoing Saga: # 3

Anchor Winch and Anchor Winch Shelf
.  
A survey (for insurance purposes) in 2016 identified that the anchor winch shelf needed strengthening and a surface crack to be filled. I don’t think the surveyor even looked at the substantial aluminium bracket attached to the bulkhead which was supporting the shelf and anchor winch.  Nevertheless, I dismounted the anchor winch, had it looked at by the yard staff as there were one or two bolts that I couldn’t undo and one had broken off.  This they duly fixed with minimum fuss.

Meanwhile I added seven layers of fiberglass to the bottom of the shelf to reinforce it as well as puttied up the surface crack.  A coat of paint and it all looked quite new.  I also painted the anchor winch, remounted it and all good.

Anchor Rode Markings.  After many years of replacing variously coloured cable ties at respective intervals on our anchor rode I decided that we could do better by painting the chain than using cable ties.  There are all sorts of different intervals that are used to mark various distances along the chain by almost as many cruisers – quite amazing actually – so we stuck to our own system devised when we first purchased the boat.   

To keep the Galley Slave happy, as she is also the boat’s anchorer and recoverer, I agreed that we would also continue to use (some) cable ties.  Consequently, our anchor chain is marked pretty comprehensively with all sorts of different painted colours and matching cable ties.  GS says she likes the paint but insists that the cable ties should remain as this ‘matches her requirements for interior decoration’.  Actually, the chain can get covered in mud on ICW forays, so paint can be difficult to see.  Hence the need for both.

Only "SHE who anchors" can explain Boy Wonder's creative markings.
But it all seems to work...

Sunday, November 18, 2018

2017 & 2018: In the Yard & Keeping Cool

The Saga Starts: # 1

I've written heaps for 2017 & 2018 years largely because we started in Aug 2017 and remained overseas well into 2018.  Our usual seasonal schedule was out the window, over-ruled by the need to cross the Atlantic again.  I started back in Lagos, Portugal and was unaccompanied for the first several weeks as I wanted time to be able to work on the boat by myself without having to work around other crew, (
namely wife/ GS aka galley slave), on board. (You understand, right?)  I was able to do heaps which was just great and it didn’t matter how messy the boat was.  Sopromar is a great boatyard, well resourced for boating spares, helpful technicians and staff and also in a great location, just a short walk away from supermarkets, restaurants and shops.

I had a couple of major projects planned and as always there's ongoing maintenance.  I also needed to check on all our safety equipment to make sure we were prepared for the voyage ahead.  Given that there's quite a bit to cover and I was busy doing a lot of the work myself, I didn't get round to taking photos.  So, lots of words without the visuals for the time being.  So, let's begin:

Dirty Boat.  The boat was filthy when I got back to it having been on the hard for some 10 months or so.  It took several days and washes before it was back to any decent level of cleanliness.  Nevertheless it had to be washed down every week, such are the prevailing conditions around the Sopromar yard.  There is a dirt car park just in front of the boat and winds/rain loaded with Saharan sand blow across the Med to Portugal.  Nothing you can do about it, just clean, clean, clean.

New Awning.  It was quite hot when I arrived at the boatyard in mid August, so I immediately started work on a new awning to replace the original, which was falling apart.  The fabric was sun shade material which was purchased in Greece many moons ago but for the past few years it was not so slowly falling apart.  I had tried to patch it up using contact glue, which was okey for small repairs or I sewed it using my on-board sewing machine.  Anyway, it was time to replace it and so I brought some sun shade material from Oz.  
The new easy-to-install sun cover keeps us cool & looks neater
I pulled the old awning  apart and used the ‘framework’ of sunbrella material which never seems to deteriorate at all.  I simply used the old shade cloth as a pattern and cut out the new one to the same size (mostly).  Amazing how you think you have accurately copied the old onto the new but, alas no, as you need to be able to stretch out the new cloth so that it is pretty tight before marking the pattern.  This was something I was not able to do well on the yard's cement, try as I did.  So there were a few bits and pieces that had to  be lopped off the new shadecloth when it came to sewing the new shadecloth to the old ‘framework’ sunbrella.  

Anyway, despite these few annoyances and some slight readjustment of lines to various tie down points on deck, it all worked out well.  So we have a nice new strong awning  that takes no more than five minutes to put up and does a great job of keeping the sun and heat off the deck/coachouse.  Took about a week to do, longer than I anticipated but isn’t that always the same with boat jobs.

Companionway Steps.  These steps had been annoying me for years.  It wasn't too difficult to remove 6 timber steps which were badly scratched and showed it.  I sanded them back using the high speed grinder sanding attachment, then applied three coats of water based varnish.  Improved them 1000% and applied each coat immediately after the previous one as they dried very quickly.  Easy quick job that improved the interior of the boat remarkably.

Friday, November 16, 2018

2016: We Continue to Float...

Albania:
Finally, and a whole month later, we were able to throw off mooring lines and move on from Greece.  We made for Sarande, with an increasingly nasty swell kicking in from the west.  Although we’d planned a two day stopover in this pleasant town, our feet rarely touched ground.  In the conditions, poor WJ3 was driven against a large concrete dock, eventually losing a guard rail in the battle.  Our fenders did a sterling job though and only one was lost in the line of duty:

Damaged Fender.  We left the boat briefly whilst dockside in Albania.  When we got back we found one of our fenders had been used on another boat.  Our local agent at the dock (a public one) at Sarande had another boat bouncing against the dock.  Like us, the crew was away for the day.  The agents “borrowed” one of our fenders, returning it at the end of the day.  However it was pretty squashed due to its heavy pounding against the concrete dock all day.   The agents reimbursed us the cost of replacing this fender which was good of them.  The old one’s still usable, to an extent.  Anyway, well managed by our capable and friendly agent, Agim Zholi and his super team.
We had company and pleasant weather for the crossing to Sicily
Sicily:
Now, we had only two months to cover Malta and Italy, plus get WJ3 hauled out and put to bed.  Something had to give and a stopover in Tunisia, perhaps not the safest of options anyway, was struck from our list.  Stops along Italy’s heel and toe were also given a big miss as we made the most of a few days of good weather to cross to Sicily.  Syracuse was delightful.  Initially we anchored until THE plan was modified, yet again, to include a dash for Malta on public transport and a few short excursions locally.  The Syracuse Marina had a vacancy for us, so we felt comfortable leaving WJ3 on her own for a week whilst we escaped to Malta.
We had an excellent vantage point from the marina in Syracuse to watch the world go by
Before I finish with Syracuse, let me comment on Chandlers.  On arrival, we began to understand that life here was somewhat laissez-faire for travel agents and chandlers alike.  There are only two chandlers in Syracuse.  The one closest to the marina did not have all that we wanted.  Another is a bit of a walk out of town.  After locating it, we entered as the door was open and asked staff, who were clearly working behind the counter, about the part we needed.  Language difficulties aside, we were informed that it was their lunchtime and to come back in 45 minutes.  We never did…
  
Boat life went without a hitch after that, except for a struggle in the Aeolian Islands to free our anchor.  It had managed to wrap itself around large rocks and grumpily refused to budge.  Just as we threatened to launch the hookah unit (diving without tanks), it freed up.  Not without wafts of an overheated anchor winch filling the bay.  Lucky on two accounts – not to have burnt out the motor or to have lost the anchor!

The weather remained somewhat challenging during the remainder of our time in Italy.  Add to the mix, heat and crowds on holiday in August.  All these “challenges” added further delays to our tight and ever-varying schedule.  Let’s just say, we arrived in Portugal with enough time to request a visa extension. 
The anchor winch might have been overheating;
at least Vesuvius was not...
Another lesson learned is how much easier it is to prep the boat in a marina rather than a boatyard.  So we moved into Lagos Marina for a couple of weeks of chores then hauled out in Sopromar Boatyard before flying home.  After all the dithering, excitement and stress, we've decided to say “Ciao, baby” to the Med (after a wonderful 6 years) and began to prepare for a dash back across the Atlantic in 2017.  
Heading out of Lagos Marina to Sopromar Boatyard for haulout & home

Thursday, November 15, 2018

2016: Run for Cover...

The anchoring field was busy in June
The plan for this year was to cover Italy and Malta.  First stops were ports we missed on our 2015 “round the Adriatic tour”, then cross to Malta, head up to Sicily and finally meander up the Italian west coast taking time to hit all THE tourist spots.  Haul out decisions would be made on the fly; hoping for somewhere along the French or Spanish coast.  Big plans and bigger problem - namely our limiting 90 day visa!  We’ve moaned about this before on the WJ3 blog but the difference with the middle section of the Med is that there is nowhere “close” to run and hide.  

Greece:
2016 began with the usual boatyard chores in Aktio - two weeks of hard slog, but who can deny it's a pleasant life.  WJ3 was treated to a professional polishing, the shower sump was unblocked, the anchor line replaced, rusty bicycles serviced and bow thruster batteries sorted out (they had not charged in our absence).  We needed an electrician to sort the battery issue out.  Finally, WJ3’s rigging was inspected – an insurance requirement.

Aktio in Preveza - a great place to haul your boat
On splashing, the engine started…that was good, but the generator again chose to be obstinate.  Hmmm, something to look at whilst on anchor, we thought.  Launching Bruce (the dinghy) too was something of a concern as the outboard stubbornly refused to function and more alarmingly, began to fill with water.  Drat!  Someone had stolen our dinghy bung – and of course, it’s a US fitting in an EU world.  To add to post-launch miseries, the bow thruster continued to be obstinate, crying out for even more professional help.  So there we sat, afloat with not much working.  Sound familiar?

Within a day of splashing, we moved into the Preveza Marina and so our precious Visa Days ticked by whilst we attended to:

Generator Coolant Pump.  It was leaking and I wasn't sure how to remove it as it's part of the engine, not a separate item like the saltwater pump.  I had a local German mechanic look at it (we’d used him before) and, on inspection, he pronounced it dead.  It was badly corroded and needed to be replaced with a new one.  This was at the start of the season at Preveza, Greece, and so we had to wait three weeks for the replacement part to be quoted, ordered and then delivered – from the US of course.  It took about an hour to put the pump on.  The generator ran fine thereafter.  I won’t mention the cost except to say that it was enormous, even the mechanic was embarrassed to tell us.

Time for a last swim at Jumping Fish Bay
Outboard Motor Not Starting.  Again, right at the start of the season, the outboard wouldn’t start, even though all was working fine at the end of the season when I run it until the carburetor ran out of fuel.  In hindsight, I should have run it in the yard before launching, but didn’t; an oversight on my part.  Anyway, after trying for some time I pulled the carburetor apart and inspected it for cleanliness.  It looked clean, but after I put it back on, it still wouldn’t start.  A kindly fellow on a nearby boat came over in his dinghy and freely offered advice, but despite his remedies, it still would not start.  Time for some searching on the web!  One useful piece of advice was that “a clean looking carbie does not necessarily mean it IS clean”.  This YouTuber advised to clean it to be sure, especially by inserting a thin wire into every orifice possible.  Well, I did this and the outboard started just fine.  So, big lesson here is that just because a carbie looks clean doesn’t mean it is and so do what I eventually did.  I’ll freely admit I did not see anything suspicious as I prodded and probed with my fine piece of wire.
  
Refrigerator Re-gassing.  Ahhh, yet again we had to have the refrigerator motor/evaporator re-gassed with the unusual hard-to-locate gas required for our Grunert 110 volt fridge.  Our reliable mechanic, although licenced, was not available so we contacted a local guy recommended by the marina.  Short story is he tried to rip us off by quoting and then trying to raise the price on the day.  Also, he tried to convince us to do more modifications than necessary.  Anyway, the fridge worked once it was re-gassed.  This little episode, apart from expensive now annual re-gassings, prompted much discussion on “a better way” to refrigerate given that our little WAECO battler was working brilliantly and running diligently on 12 volt sunshine power.

AIS.  We had purchased a GME AIST 120 and I fitted it next to the chart table, connected to our laptop via the program CD that came with it, and yet another antenna was fitted to the pushpit.  It works okey but we have since passed a number of ships at quite close range and there has been no signal received from them at all.  I certainly would not rely on it. 

There's more to follow....

Sad to be leaving our favourite Taverna over near Aktio

Monday, January 11, 2016

2014: Repairs in the Marina

Marmaris, Turkey: Part 1

(Finally there's a bit of time to update the H460 blog...between bouts of boat maintenance and house renovations!)

Life on the Hard - with unsurpassed views
Sails Cleaned and UV Stitching Replaced.  I took up an offer at the marina sailmakers in 2013 to have the sails washed and inspected when we stored the boat on the hard in Marmaris.  It was all quoted and we left the sails with the sailmaker to pick up on return in 2014.  I left a deposit (payment of 50% was what the rules said) and, I noted accordingly on their invoice as the sailmaker doing the paperwork said she was not going to issue a receipt just now but when I paid fully next year.  Okey, when in Rome …  To cut a long story short, when I went to pick up the sails she denied any payment having been made.  I pointed out my note and she said ‘this has never happened before … la la la … but I was not backing down.  So, she reluctantly accepted my point and the balance.  I complained to the sailmaker manager only to find out that everyone working there is family so no real point taking it further with that lot.  I was quite prepared to take it up with the marina manager but not really necessary as it turned out. 
All the stitching on the UV covers was redone however, so overall I got what I paid for.  Big lesson, whenever making a payment always get some receipt or, if in Greece where they don’t know about receipts, make some note of any payments, like I did with this lot.
Bike Bags.  Before our falling out I had also purchased a couple of big old sail bags quite cheaply and we use them to store our bikes in – much neater and good protection from the elements as we put the bikes in the dinghy on its davits when sailing.
I also needed my continuous furling line replaced but, at this stage, the sailmaker was not interested, for obvious reasons.  For my solution, see below.
I should also have included the webbing on the clew of the mainsail to be restitched, but didn’t (my fault) and paid the price - more on that later too.
 
A very professional launch in Marmaris
Boat Detailing.  At the marina, very shortly after being placed in a cradle on the hard in 2013, I was quickly approached by a few of the private tradespeople that occupy their own workshops around the wall of the marina.  I accepted one quote to polish the topsides and stainless steel and also to undertake professional gelcoat repairs to hairline cracks and other minor scratches and repairs that have appeared over the years on the deck and topsides.  It also included one coat of antifouling to the bottom and he also raised the waterline around the stern as requested.  All for a very reasonable price.  He also undertook to wash the boat down each month while we were at home and that he would let me know when he had done so each time.  He gave me contact details of previous customers whom I contacted and they were generally pleased with his work.  One said don’t make the final payment until the boat is back in the water as his staff did not do the final anti fouling on the spots on the hull that can’t be done while the boat is in its cradle.  As it turned out on the launch day it was more convenient for me to do it myself anyway.
All the work was carried out as promised except I had to chase him up about the wash downs each month.  When I did enquire he answered promptly and also gave me updates on the work to be, and being, done.  He only required a very small deposit before I left, a part payment shortly after I returned, and then the balance on completion of all the work ie when the last dabs of paint were put on when the boat was picked up for relaunching .  Highly recommended providing you take an ongoing interest in progress etc.
Turkey's coast is a picture postcard delight

Friday, December 27, 2013

2013: End of Season Comments

Repairs & Maintenance Underway:

Spinnaker Furler  - a further comment… (Spanish Experience).  Well, we didn’t purchase one this year as the particular Profurl model I was after didn’t have any torsion lines available.  They were coming up with an improved torsion line as it turned out and it is now on the market – it looks much better than the original (it appears to have all these little balls on the line which, I assume, makes furling more efficient).  The winds we experienced on our voyage this year didn’t really suit flying spinnakers ie on the nose or, if in the right direction, too strong to fly a spinnaker on a cruising boat.  Something for the future perhaps and it certainly remains on my shopping list.  I will also purchase a removable bowsprit to get the tack of the spinnaker forward of the pulpit.
Some subscribe to really slow boating
Broken Dunny Seat Hinge.  Someone sat down too heavily on our guest dunny (I think it was me) and a hinge broke making it very unsafe at sea (just use your imagination).  New hinges were purchased and one of our guests was asked to take off the old and attach the new (using stainless steel screws this time – why Jabsco use normal steel screws on a marine toilet seat escapes me as they are otherwise an excellent product) while the skipper did other things.  Apparently, it was quite a performance to remove the old screws and hinges but I did realise how “handy” or self-reliant boaties must be in general to keep our boats ticking over and in good working order.  Anyway, the throne is all back together and providing safe seating once again.
Fridge Repairs Underway.  In Greece our fridge and freezer gradually lost most of its refrigerant/gas.  We had to revert to our trusty and reliable (touch wood) Waeco.  Some friendly Canadian neighbours we shared an anchorage with at Kuruca Buku, Turkey had a handheld refrigerant leak detector.  This worked a treat and we quickly identified the leak along the gas line at one of the fittings.  A bit of a tighten with a spanner and no more leak.  When we arrived at Marmaris a fridge technician topped up our gas, checked for any further leaks and we were back in business.  It makes a huge improvement to life on board (for the galley slave particularly).  I will purchase one of these detectors and use it to scan for leaks every week or so – they only cost around $30-50.  If I had done this earlier I would have detected and fixed the leak and regassing is not cheap.  This experience also speaks volumes about cruising camaraderie - somewhat in short supply in a touristy Med.  So, well done & greatly appreciated!
Sunset over Ibiza, Balearics

Sunday, December 15, 2013

2013: Year 6 - Work in Lagos

Sopromar Boatyard:
Time to get our hands dirty again!
Bow Thruster.  I’ve just lashed out and had a new one fitted in the bow – I would have liked to have both a bow and stern thruster but the boat doesn’t have enough room in the stern – too much other stuff.  I’ve been sort of avoiding fitting a bow thruster, almost as a matter of pride (plus they’re not cheap) and, after I’ve bumped my way around a marina, I could always say “well, I don’t have a bow thruster like you people.”  I’ve also seen a number of times skippers playing with their bow thrusters, and at the same time getting into difficulties, when they should just be motoring forward into their berth.  However, just about everyone I’ve met that has a bow thruster seems to swear by them.  So, providing mine works okey I’ll not have any more excuses when manoeuvring in and out of marinas.  Its been professionally fitted at Sopromar Boatyard.  No fuss!
We arrived to a new bow thruster (WJ3's now sprouting nostrils)
Spinnaker Furler.  We have a cruising chute which hasn’t been getting enough use because it’s contained in a sock (which is good) but requires a bit of work to set and take down.  We can both envision me getting wrapped up in a chute, going overboard and Galley Slave left to sort everything out, return to pick me up and us both being terribly traumatized by the whole event.  Much better to do everything from the cockpit, just like we (almost) do now.  So, I’m presently trying to purchase a spinnaker furler, which is not as easy as it sounds.  Anti-torsion lines are a real problem to obtain apparently and so I’ve been trying to make this purchase for a couple of months now.   I’ll report on how things turn out later on.
Even Bruce got some attention this year!

And we had time for some local siteseeing

Before Launch Day arrived
(& our mission this year - to cross to Turkey)

Saturday, December 14, 2013

2012: Hot for the Rock

Repairs & Upgrades Underway: Gibraltar
Great, we've made it in time for the Rugby finals!
Passerelle/Gangplank.   I don’t know if I’ve spelt it correctly but, in effect, it’s a gang plank, walkway that you attach to the bow or stern of the boat, depending on whether your boat is bow on or stern in to a jetty, pontoon, etc.  In Gibraltar everyone had a plank except us so we had to climb over the pulpit and then step out boldly to get onto the (fixed) jetty – not for the faint hearted.  I made a passerelle out of an aluminium ladder with a ply plank bolted to the rungs (plank sourced from a local wheely bin).  At one end, where it lay on the jetty, I bolted a couple of wheels on (to allow for movement from swell, tide, wakes made by various passing traffic).  It was a draw bridge arrangement so that the wheeled end was elevated when not going ashore, which was most of the time.  The boat end of the passerelle was attached, with ropes, at right angles across a sturdy piece of timber that I had bolted (with u bolts) to the base of the pulpit – it had to take the full weight of me with groceries, etc.  The ropes acted as hinges allowing the plank to be raised and lowered quite easily.  The jetty end of the plank also had a bridle attached to it (separated a bit just over head height by a piece of plastic conduit) and the top end of the bridle was attached to the end of the spinnaker halyard.  Pull on the spinnaker halyard and the bridge rises – lower the halyard to let the wheeled end down on to the jetty.   To assist to make lowering and raising easier I attached a jerrycan of water to the bottom end of the halyard so that it became a one handed job  to raise and lower the plank.  It works well and the whole thing cost (ladder, wheels, bolts) about 80 GBP.  Alternatively you can buy very nice folding ones from a chandler for about 350 GBP.
Our new passerelle - works very nicely, thank you
Television and Movies.  In Gibraltar, with time on our hands, again due to my crook wrist, I purchased and installed a television and DVD player.   I also purchased an extendable bracket to mount it on the bulkhead so that I can hold the screen immobile against the wall while sailing but can also extend the screen and rotate it when viewing it from the comfort of our saloon table while at anchor etc.   It was pretty simple really.  Televisions generally only came in 240 volt or 110 volt (which I needed).   There was a 12 volt car model available but it was expensive, and very small – ie the screen was about the same size as an aircraft one that sits on the back of the seat in front of you.  For power I ran the power cable to the nearest 110 volt power point.  The DVD player simply plugs into the TV, however, we never use it.   We have been given a heap of movies on a hard drive which I have installed in a plastic bag that simply hangs on the back of the bulkhead mounting bracket.  All controls are done through the remote, which came with the TV.  I don’t know why I didn’t do this a long time ago.

We found, the hard way, that the screen can swing about in a seaway so we put two SS saddles on either side of the mounting bracket, covered the screen with a towel and use a bungee strap to hold the screen securely against the bulkhead so it can’t leap around anymore.
Why have TV with views like this?
Digital Weather Station.  In early days we purchased and mounted a Plastimo brass barometer and a clock on the bulkhead – very shippy and they look great.  The barometer has been a little disappointing for us, however, since it hardly moves – it only shows major changes in pressure which is obviously better than nothing but still limited when compared with other barometers I have used in the past.    We were impressed by the results demonstrated by someone else who had a portable digital weather station plus we had one at home and, after a quick check of Amazon, a new one – LA CROSSE TECHNOLOGY – battery operated – arrived soon after purchase.  It’s great – very accurate and shows pressure variations constantly, plus a whole lot of other information.  I still like the brass meters on the bulkhead, however!!

Shelves in Port Locker.  In the port quarter guest room, which we have converted to a storage room, there is a hanging locker that wasn’t been used to hang anything, only for storing things.  It was an inefficient use of space.  I installed some shelves and now it holds twice as much as before.  Good idea provided by the Galley Slave (GS) who took one of the shelves to expand her galley holdings.

Solar Vent for Compost Loo.  After several years of being on constantly, our solar vent exhaust fan/motor gave up.  The battery is still okey but I couldn’t source a spare motor.  So, I am now using the little computer exhaust fan that came with the compost loo wired into the boat’s lighting circuit while still venting via the solar vent.  I can unplug when I need to empty the compost bin.

We had no trouble at all filling in time in Gib

Friday, December 13, 2013

2012: Up the Sleepy Guadalquivir

Repairs & Upgrades Underway: 2012

Porto Gelves, Seville
Heading off for repairs to the outboard, Porto Gelves
Outboard Repairs.  Outboard worked fine initially in the season but then started to overheat when I really powered it up (no water coming out at the back) and of course I didn’t find this out until we left Gibraltar.  We spent most of the season powering along very slowly which outboard seemed not to mind and water duly pumped out the back.  To cut a long story short, when an opportunity finally presented itself I had a professional check it out and he simply replaced the water impeller and spark plugs.  My spare impellers and plugs, purchased some time before and where I can’t remember, were the wrong types apparently.  Anyway, outboard has performed superbly since this act of TLC by a Spanish mechanic near Seville.
We did have to wait so put the time to good use at the marina bar
(BCK is our first, brave visitor)

On anchor, early morning at Porto Gelves